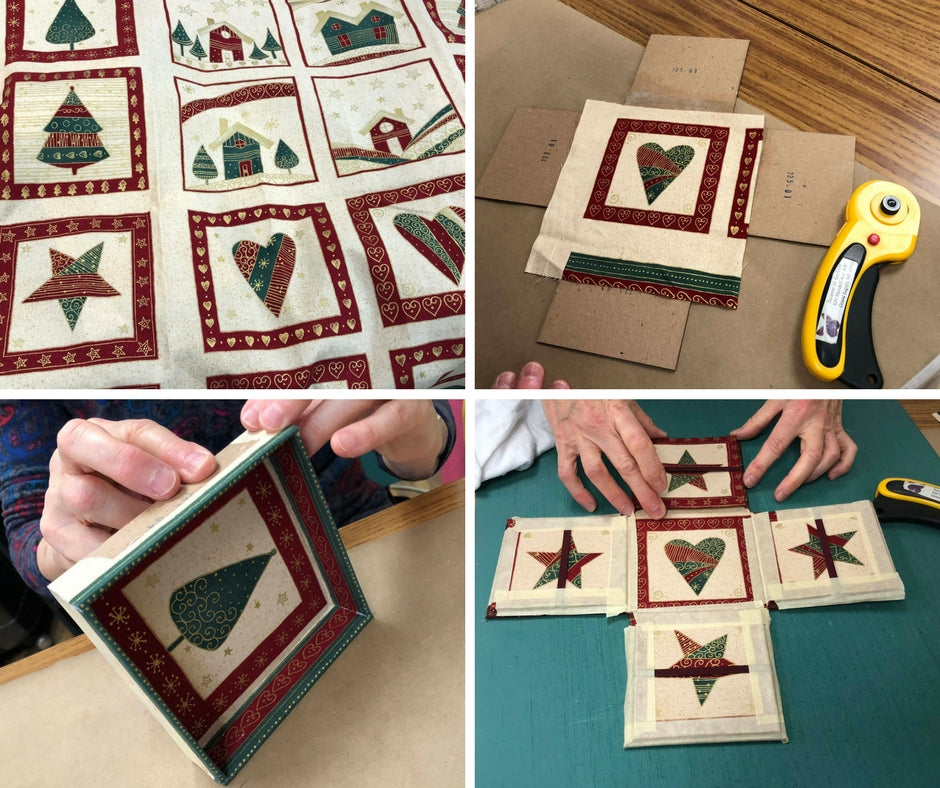
I have been making lots of cartonnage fabric boxes for a long time, but have never thought about using fabric panels until last year, when a student came to one of my classes to make a “surprise box” and brought one Christmas fabric panel. When I saw it, I thought, oh, that will be difficult, strange, not sure how that will work….but she kept making the box, coordinating that fabric with another basic, plain one, and at the end, her box surprised all of us in class. It fit perfect on the box; it was like the project was made to be used with that particular fabric! So fun! From that day….I started looking to the fabric panels with different “eyes”…you know what I mean? Looking for a perfect fabric to make some particular box! So far I have been trying and used some different ones and I would like to share with you some of my thoughts on that in this post. Hope you like it, and can see the great potential of using fabric panels in cartonnage!
Unfortunately, I don’t have a picture of the box that the student made in class without the tape, that is part of the process, but I think you can see what I mean when I say that the fabric panel fit perfect in my Surprise fabric box.

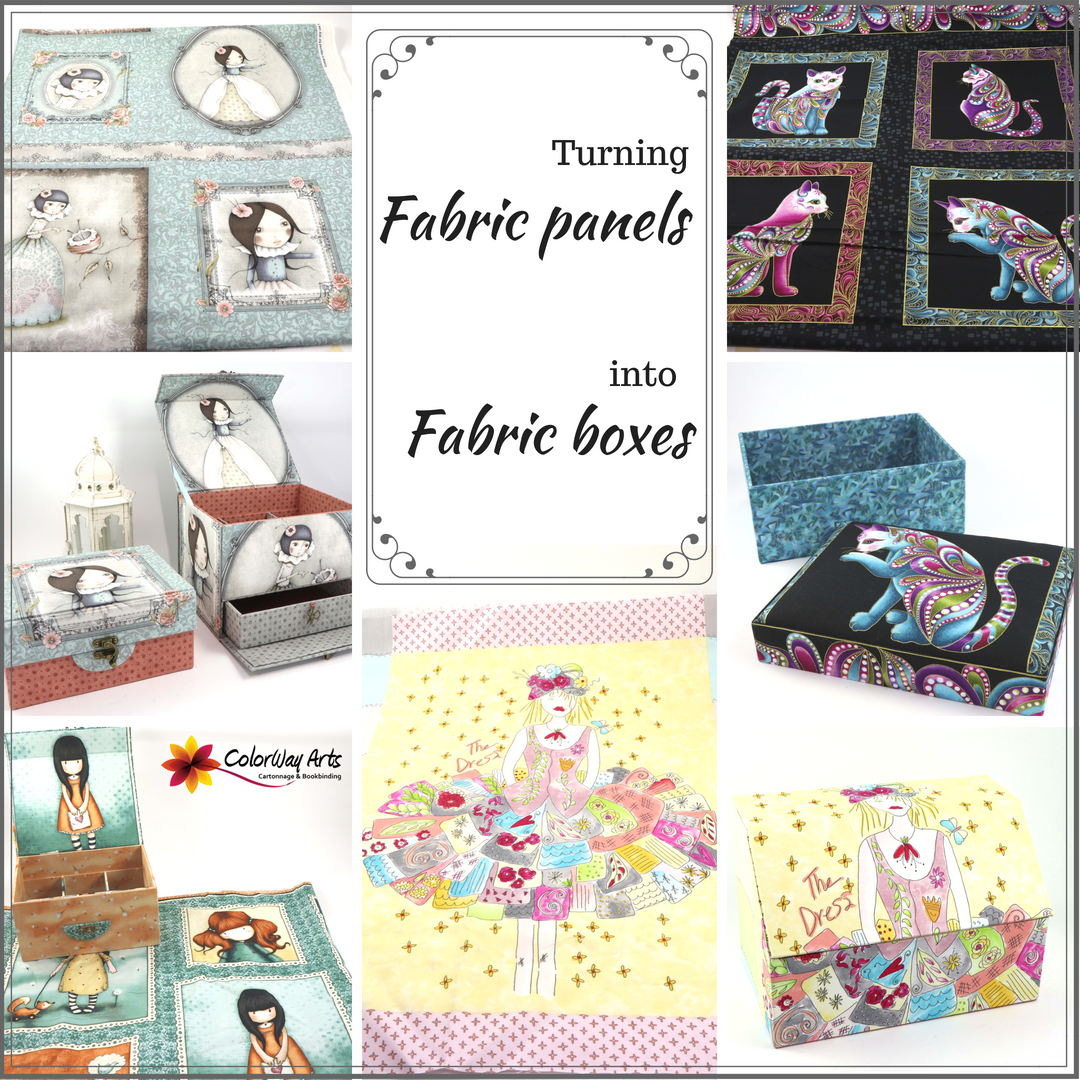
After that class, I found some fabric panels with “dolls” on it, that I loved and at that time I was just finishing my book Cartonnage basics & beyond. So, like magic, I realized that those dolls would fit perfectly on the boxes that I made for the book. I had SO much fun making the boxes, I showed the boxes at my book launch and everybody was impressed with those boxes.
Here is the first panel I played with, it’s from Santoro London Designs, fabric from Quilting Treasures.

Here are the boxes I made out of the panel, basically following the same process I would use with other fabrics, but fussy cutting the parts of the panel I wanted for some specific parts of the boxes. Aren’t them unique?


Then, I found more designs of those panels from the same company and got so excited to start a “collection” of them.


Also, in one of my local classes for this box most of the students have chosen to use the same fabric, it was so fun seeing all together!

When we are lucky to find one panel that fits perfect on top or on some parts of the boxes or journals you want, that’s easy, then we just need to take our time, and fussy cut. I would say the most difficult part is to “align” that fabric on the cardboard piece when making the projects. You can also make these boxes following the step by step process in my book, with tons of pictures, cutting your own cardboard, or, you can start from DIY kits available.
After making those, I saw this new fabric panel in a shop I teach classes in Indiana. It is called “Cat-i-tude” from Benartex Fabrics, and as I’m a cat lover, I just “had to buy it”….LOL….

I was about to make a new project for a “box with separate lid”, as the majority of my boxes and kits are for hinged lid boxes. So, I thought that a box with separate lid would be a great idea, plus I can play A LOT with the top of the box in an easier way than when making a hinged lid box. So, I made my decision, use this fabric panel for the lid of the box, and then, the coordinating fabrics from the same collection for the rest of the box. It sounds easy…..but….wasn’t that easy to figure out which fabric to use in each part of the box….it took me a while to figure out the best option. I already had one size of box that I would like to make that wasn’t really perfect for the panel….. the images on the panel are square, and my box is rectangular…. so, a little bit of the parts of the sides of the panel would show up on the top of the box, and that gave me a problem…. Which fabric to use on the sides of the lid that would not interfere with that! After a lot of thinking and testing (when testing I made the box and I just put part of the fabric on the place I want, of course without glue, just to visualize how would looks like), I decided that the best option would be using another part of the panel for the sides of the lid. And I think it was the best idea! I really loved the result, I hope you like it too!! I’m working on this project and soon we will have kits and classes for this box with separate lid.


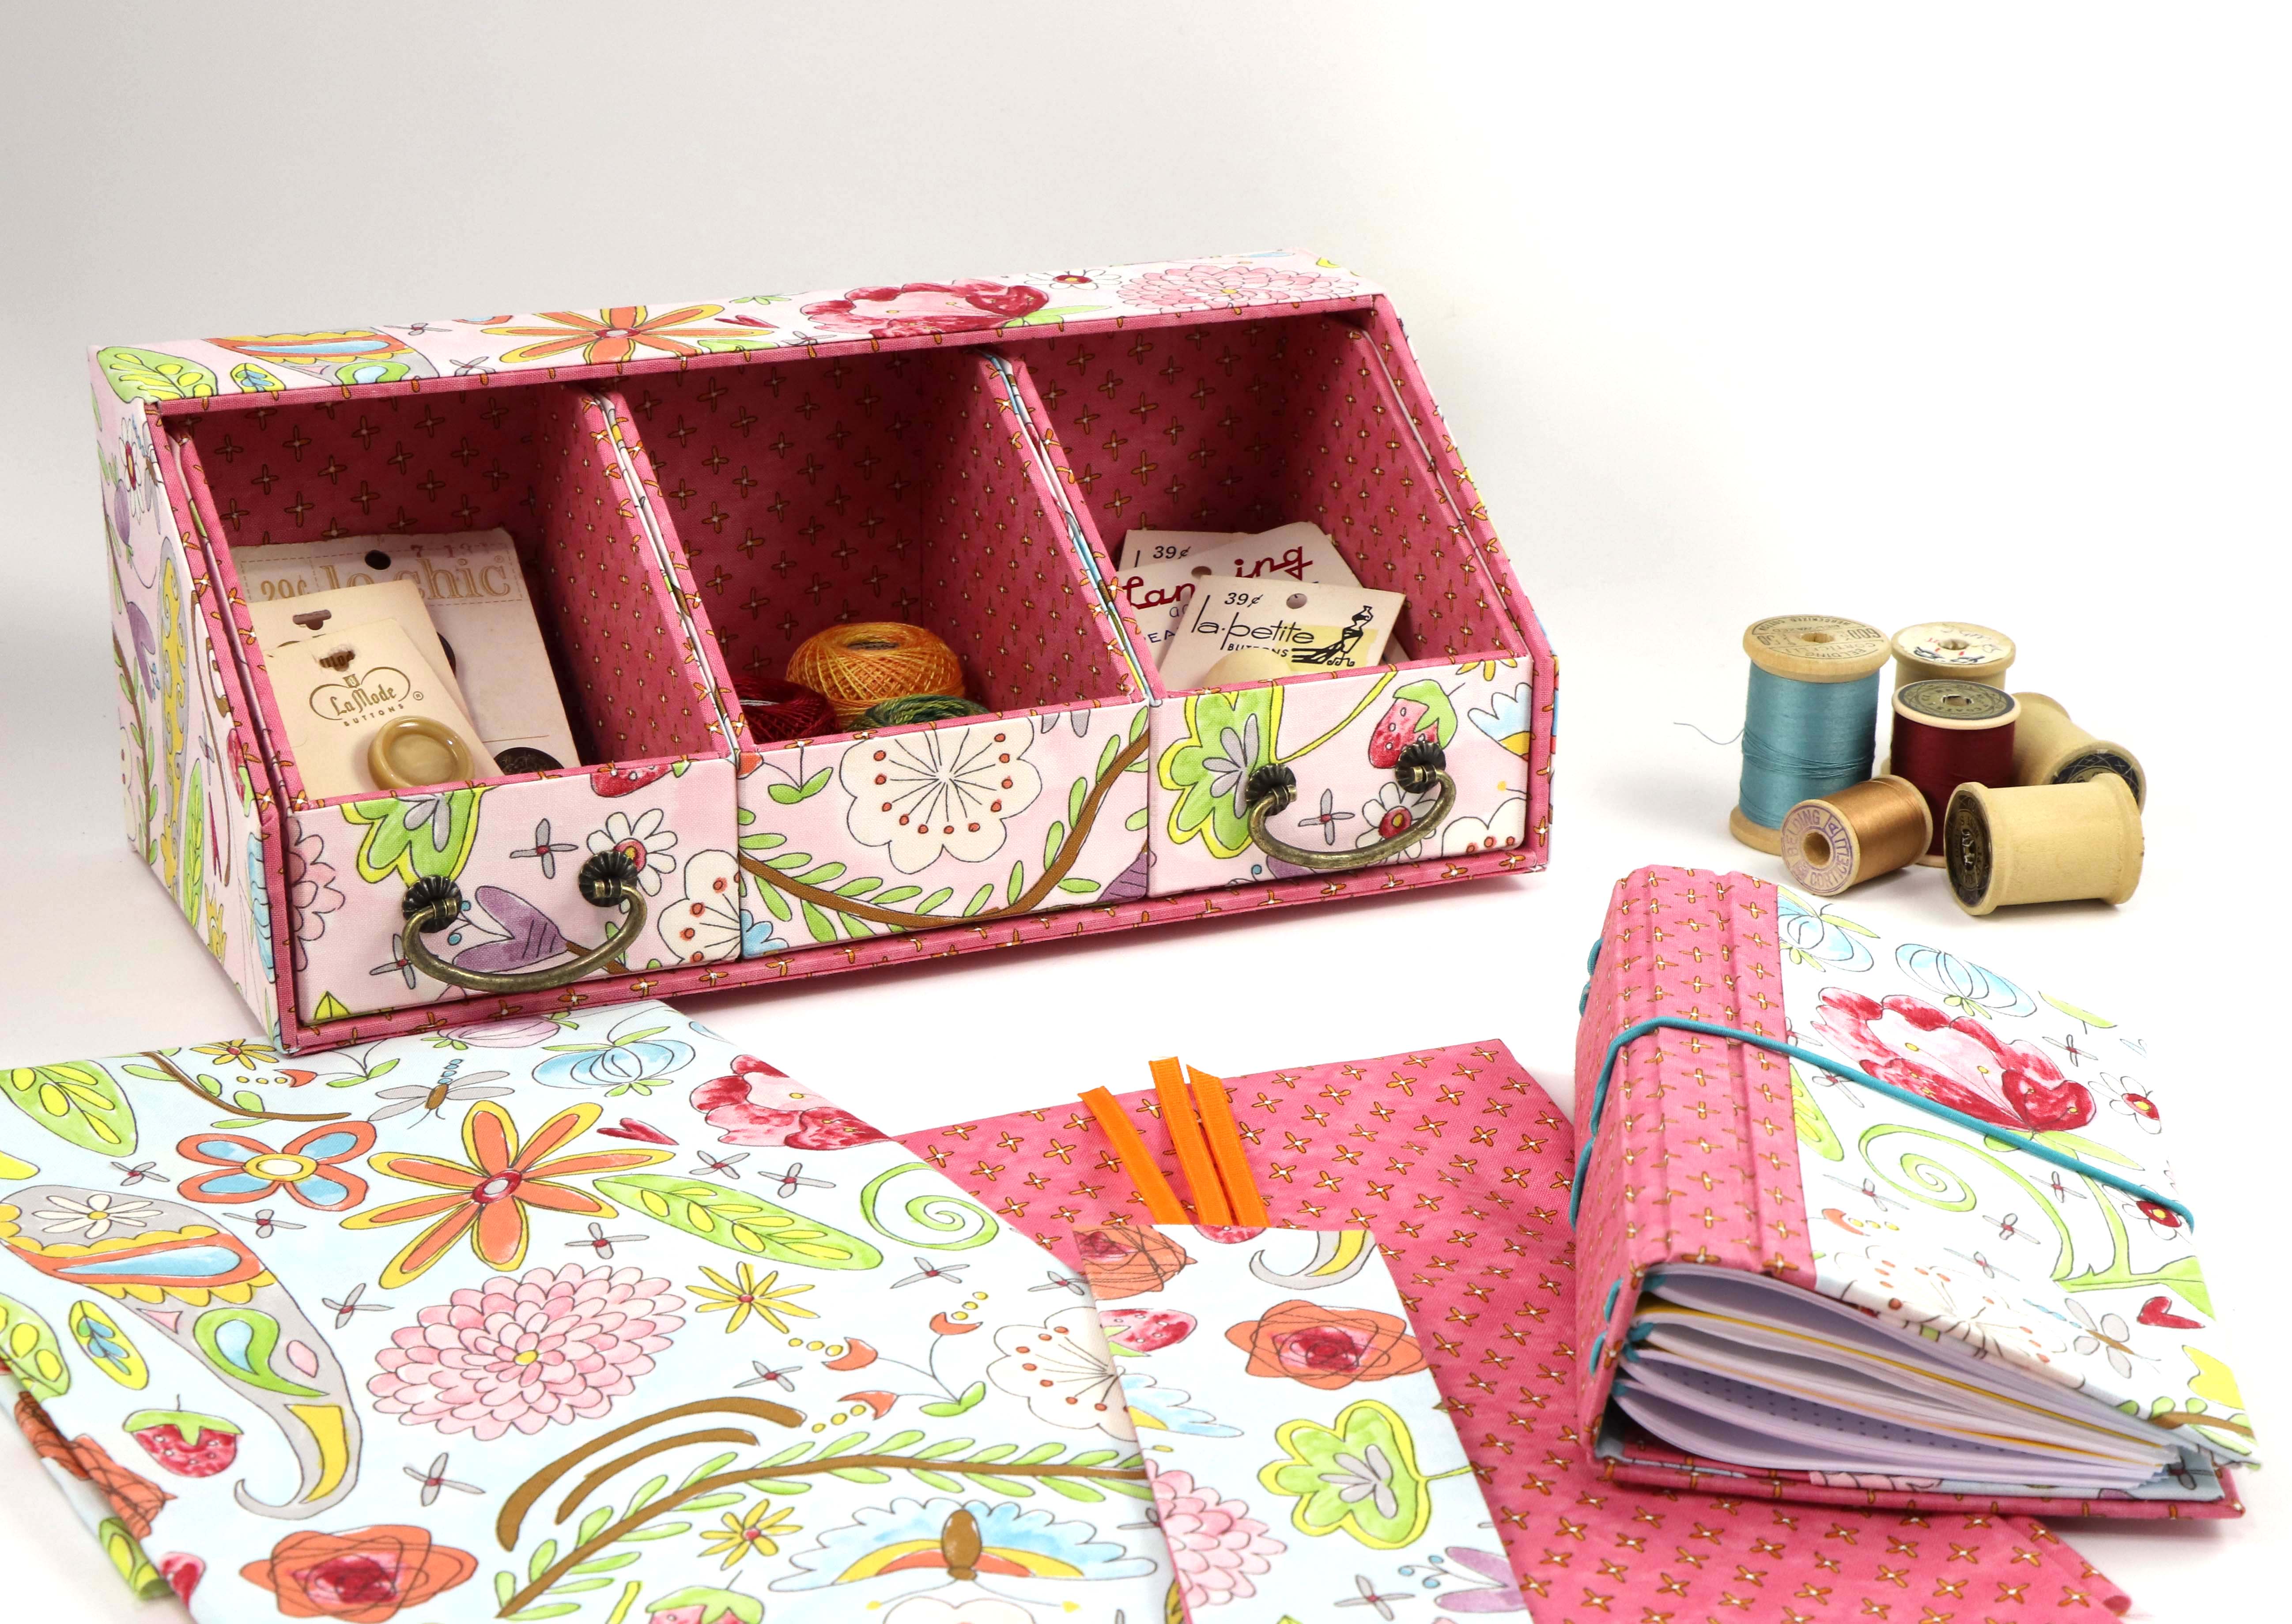
I frequently go to quilt stores and as most of my students are quilters I’m also curious about other techniques we can make with fabric and collage quilts has been one of those that catches my attention. I have tried some already (I will show you another time), but right now, I have seen lots of collage quilts made for quilters following the work, book, classes and kits of Laura Heine, and the colors of her fabric collection from Free Spirit had definitely gained my attention (and my money….LOL…. of course it was another must to have….!). I bought the fabrics but I didn’t make the collage quilts ……instead, of course, I made my boxes and cases, including a fabric Traveler’s notebook! Here is one picture of some projects I made with the Laura Heine fabric collection, so far.
 I know one of her famous collage quilt pattern is “the dress”. Then, I saw that she also has designed one panel for that “dress”. And then, I had to find one box that would fit that fabric panel! So excited!

I tried putting the fabric over a couple of my finished boxes, to figure out how would be turning out better with that idea…and I was between the project of my book and one of my oldest projects, the “treasure box”. At the end, I decided to go with the Treasure box, as it has an “inclined” lid that in my opinion would show the panel better. But, of course, would be a challenging project! Not only fussy cutting the fabric this time, I had to figure out better, as I would need to cut this panel in the middle, and part of the design would be in the lid and part of that in the box! Oh boy…. it was more challenging than I was expecting, for some reasons:
* The fabric is a light color, so, I would have to paint my cardboard with white paint before gluing the fabric, so the fabric would show up better (actually that’s easy, not a real problem and I solved in another way at the end)
* When cutting the design, I had to figure out where to cut, because I would lose some of the pattern to make the finishing of the pieces….so, the dress will not have a perfect match (lid and box!) I would say that this was one of the most difficult parts of the process… trying to figure out the best place to cut and align the pattern of the lid with the part on the box!

* I didn’t think about the “gaps” on the lid showing up in the middle of the face of the design until I actually started gluing the fabric on the top of the lid! When I saw it, I didn’t like it…. So, I removed the fabric, and of course, it was too late….. part of the cardboard came with the fabric and I couldn’t use it anymore…sad…. But at least, the panel came with two images, so, I still had the other one to make my box! (sometimes experimenting has some loses….. part of the process, right?)
* As I didn’t like the gaps on the outside of my lid, I decided to change the process, and cover what usually is my “inside” of the lid, with no gaps. Now I would have the gaps inside of my lid. But, for that, it was almost too late, because on that part, I have some kraft papers showing up there that doesn’t allow a good finishing for the outside just gluing the fabric over. (Note: what I made next, was an improvisation…. There is a better way to do that, and I just realized later…..so, if you want to make a box exactly like that, first contact me, and I can help you doing better, or wait a little bit because I will make instructions for that, ok?) At that point, I decided to glue some white construction paper over that part of the box (actually I glued two pieces). That helped me to not “feel” the kraft paper anymore, and was white, so the fabric showed better (again, there is a better and easier way to do this! Ask me if you need now). And from there, I followed the process and finished the box.


Here is what I have left of the panel, the legs! I liked to see this next picture, FUN! As I said, if I had planned better would be easier...but now, I know, next time will be better!

I have one online class teaching how to make this “treasure box” and I will upgrade this course during summer. I will add this option of using it with the lid in a different way, and more upgrades.
Well, that was what I had to show to you at this point! I already bought some other fabric panels that I loved and will continue making and trying…. and I will let you know, because if I go ahead and try, then, you don’t have to make the same mistakes as I did, right?
If you have one specific fabric panel that you love and want my opinion how to use it, or if you have a suggestion for me to test next, let me know, I will love to hear from you!
I hope you liked this possibility of playing with fabric panels and have even more fun with cartonnage!
To learn more about cartonnage, fabric boxes, to see my book, my class schedule, check my website: https://www.colorwayarts.com/
Unfortunately, I don’t have a picture of the box that the student made in class without the tape, that is part of the process, but I think you can see what I mean when I say that the fabric panel fit perfect in my Surprise fabric box.
After that class, I found some fabric panels with “dolls” on it, that I loved and at that time I was just finishing my book Cartonnage basics & beyond. So, like magic, I realized that those dolls would fit perfectly on the boxes that I made for the book. I had SO much fun making the boxes, I showed the boxes at my book launch and everybody was impressed with those boxes.
Here is the first panel I played with, it’s from Santoro London Designs, fabric from Quilting Treasures.
Here are the boxes I made out of the panel, basically following the same process I would use with other fabrics, but fussy cutting the parts of the panel I wanted for some specific parts of the boxes. Aren’t them unique?
Then, I found more designs of those panels from the same company and got so excited to start a “collection” of them.
Also, in one of my local classes for this box most of the students have chosen to use the same fabric, it was so fun seeing all together!
When we are lucky to find one panel that fits perfect on top or on some parts of the boxes or journals you want, that’s easy, then we just need to take our time, and fussy cut. I would say the most difficult part is to “align” that fabric on the cardboard piece when making the projects. You can also make these boxes following the step by step process in my book, with tons of pictures, cutting your own cardboard, or, you can start from DIY kits available.
After making those, I saw this new fabric panel in a shop I teach classes in Indiana. It is called “Cat-i-tude” from Benartex Fabrics, and as I’m a cat lover, I just “had to buy it”….LOL….
I was about to make a new project for a “box with separate lid”, as the majority of my boxes and kits are for hinged lid boxes. So, I thought that a box with separate lid would be a great idea, plus I can play A LOT with the top of the box in an easier way than when making a hinged lid box. So, I made my decision, use this fabric panel for the lid of the box, and then, the coordinating fabrics from the same collection for the rest of the box. It sounds easy…..but….wasn’t that easy to figure out which fabric to use in each part of the box….it took me a while to figure out the best option. I already had one size of box that I would like to make that wasn’t really perfect for the panel….. the images on the panel are square, and my box is rectangular…. so, a little bit of the parts of the sides of the panel would show up on the top of the box, and that gave me a problem…. Which fabric to use on the sides of the lid that would not interfere with that! After a lot of thinking and testing (when testing I made the box and I just put part of the fabric on the place I want, of course without glue, just to visualize how would looks like), I decided that the best option would be using another part of the panel for the sides of the lid. And I think it was the best idea! I really loved the result, I hope you like it too!! I’m working on this project and soon we will have kits and classes for this box with separate lid.
I frequently go to quilt stores and as most of my students are quilters I’m also curious about other techniques we can make with fabric and collage quilts has been one of those that catches my attention. I have tried some already (I will show you another time), but right now, I have seen lots of collage quilts made for quilters following the work, book, classes and kits of Laura Heine, and the colors of her fabric collection from Free Spirit had definitely gained my attention (and my money….LOL…. of course it was another must to have….!). I bought the fabrics but I didn’t make the collage quilts ……instead, of course, I made my boxes and cases, including a fabric Traveler’s notebook! Here is one picture of some projects I made with the Laura Heine fabric collection, so far.
I know one of her famous collage quilt pattern is “the dress”. Then, I saw that she also has designed one panel for that “dress”. And then, I had to find one box that would fit that fabric panel! So excited! I tried putting the fabric over a couple of my finished boxes, to figure out how would be turning out better with that idea…and I was between the project of my book and one of my oldest projects, the “treasure box”. At the end, I decided to go with the Treasure box, as it has an “inclined” lid that in my opinion would show the panel better. But, of course, would be a challenging project! Not only fussy cutting the fabric this time, I had to figure out better, as I would need to cut this panel in the middle, and part of the design would be in the lid and part of that in the box! Oh boy…. it was more challenging than I was expecting, for some reasons:
* The fabric is a light color, so, I would have to paint my cardboard with white paint before gluing the fabric, so the fabric would show up better (actually that’s easy, not a real problem and I solved in another way at the end)
* When cutting the design, I had to figure out where to cut, because I would lose some of the pattern to make the finishing of the pieces….so, the dress will not have a perfect match (lid and box!) I would say that this was one of the most difficult parts of the process… trying to figure out the best place to cut and align the pattern of the lid with the part on the box!
* I didn’t think about the “gaps” on the lid showing up in the middle of the face of the design until I actually started gluing the fabric on the top of the lid! When I saw it, I didn’t like it…. So, I removed the fabric, and of course, it was too late….. part of the cardboard came with the fabric and I couldn’t use it anymore…sad…. But at least, the panel came with two images, so, I still had the other one to make my box! (sometimes experimenting has some loses….. part of the process, right?)
* As I didn’t like the gaps on the outside of my lid, I decided to change the process, and cover what usually is my “inside” of the lid, with no gaps. Now I would have the gaps inside of my lid. But, for that, it was almost too late, because on that part, I have some kraft papers showing up there that doesn’t allow a good finishing for the outside just gluing the fabric over. (Note: what I made next, was an improvisation…. There is a better way to do that, and I just realized later…..so, if you want to make a box exactly like that, first contact me, and I can help you doing better, or wait a little bit because I will make instructions for that, ok?) At that point, I decided to glue some white construction paper over that part of the box (actually I glued two pieces). That helped me to not “feel” the kraft paper anymore, and was white, so the fabric showed better (again, there is a better and easier way to do this! Ask me if you need now). And from there, I followed the process and finished the box.
Here is what I have left of the panel, the legs! I liked to see this next picture, FUN! As I said, if I had planned better would be easier...but now, I know, next time will be better!
I have one online class teaching how to make this “treasure box” and I will upgrade this course during summer. I will add this option of using it with the lid in a different way, and more upgrades.
Well, that was what I had to show to you at this point! I already bought some other fabric panels that I loved and will continue making and trying…. and I will let you know, because if I go ahead and try, then, you don’t have to make the same mistakes as I did, right?
If you have one specific fabric panel that you love and want my opinion how to use it, or if you have a suggestion for me to test next, let me know, I will love to hear from you!
I hope you liked this possibility of playing with fabric panels and have even more fun with cartonnage!
To learn more about cartonnage, fabric boxes, to see my book, my class schedule, check my website: https://www.colorwayarts.com/